
📑 Table of Contents ▶
- 20 Minute Pan Fried Korean Soy Garlic Chicken Thighs
- Fundamentals
- Preparation/setup
- Directions
- Mastering the Technique for Perfectly Crispy Chicken
- Technique
- Tips/tricks
- Perfecting Results for Optimal Flavor
- Perfecting results
- Troubleshooting/variations
- Serving and Presentation Ideas for a Beautiful Meal
- Serving/presentation
- Pairings/storage
- Conclusion
- 20 Minute Pan Fried Korean Soy Garlic Chicken Thighs
20 Minute, Pan Fried Korean Soy Garlic Chicken Thighs
The aroma of soy garlic chicken fills the kitchen with a delightful richness that draws everyone in. I clearly remember the first time I made this dish; it was a hectic weeknight, and I needed something that would appease the whole family without consuming the entire evening. I found this recipe, and within 20 minutes, I put dinner on the table. It quickly became a go-to meal in our weekly rotation.
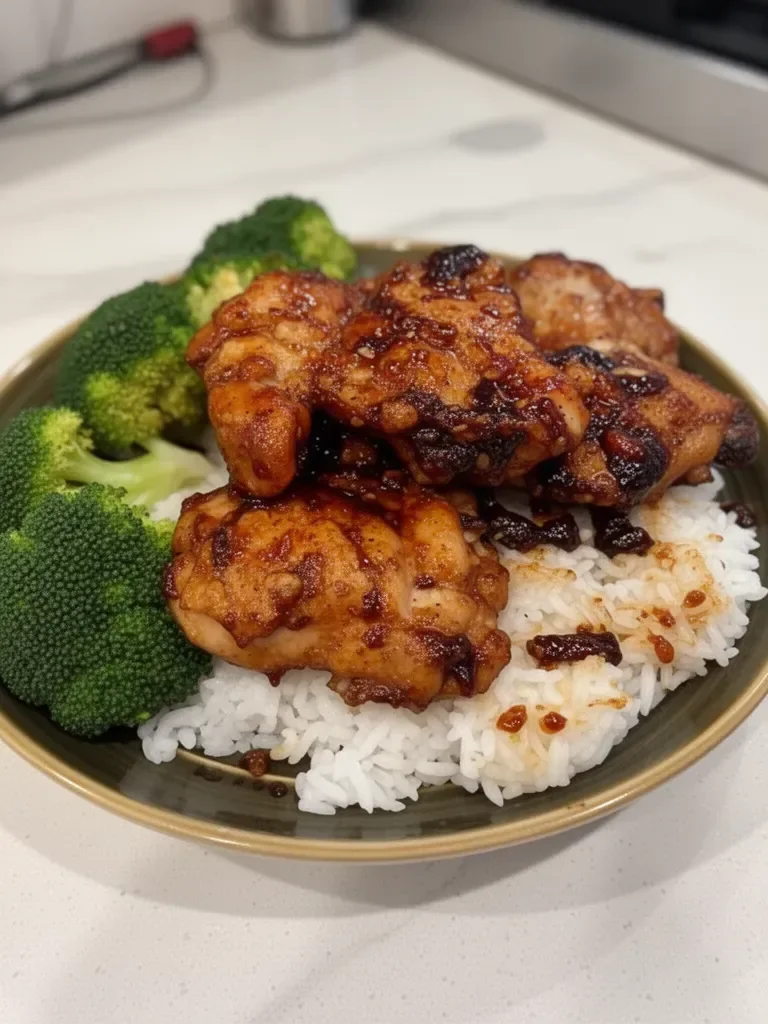
The best part about Korean soy garlic chicken thighs is the crispy exterior combined with a glossy, savory sauce that clings to the chicken perfectly. After that first successful attempt, I found myself experimenting with different sides and variations. Still, the original recipe remained a firm favorite, especially when paired with hot white rice and a side of vibrant broccoli.
In just a short amount of time, you can create a comforting meal that tastes like it came from your favorite restaurant. This dish exemplifies how simple ingredients can come together to create something truly spectacular. Mastering this recipe will elevate your weeknight dinners and impress your family and friends.
20 Minute Pan Fried Korean Soy Garlic Chicken Thighs
Fundamentals
When it comes to quick chicken dinners, pan-fried dishes often steal the show. Using juicy boneless chicken thighs provides a rich flavor and tender texture that pleases even the pickiest eaters. The soy garlic sauce plays a pivotal role, as its combination of savory and sweet elements infuses the chicken with incredible depth.
Understanding the foundation of this dish helps transform ordinary ingredients into something extraordinary. The key here is balancing flavors and textures. The crispy coating adds a satisfying crunch, which contrasts beautifully with the sticky soy garlic sauce. Plus, you won’t find a quicker way to achieve such delicious results.
Preparation/setup
Before cooking, ensuring that you’ve set up your workspace simplifies the process significantly. Start by gathering all the ingredients in one area of your kitchen. That way, you can easily reach for what you need as you progress through the cooking steps.
Once everything is ready, take a moment to pat the chicken thighs dry. This small step helps achieve that coveted crispy texture by removing excess moisture. Mix your dry ingredients for the coating in a shallow plate so it remains easy to coat each piece without creating a messy workspace.
Ingredients
This dish requires the following ingredients:
- 5 pieces boneless chicken thighs
- 4 tbsp cornstarch
- 4 tbsp all-purpose flour
- ½ tsp garlic powder
- ¼ tsp salt
- ¼ tsp black pepper
- 4 tbsp garlic, minced
- ¼ cup dark soy sauce
- ¼ cup water
- 2 tbsp honey
- 2 tbsp rice vinegar
- 2 tbsp light brown sugar
- 1 tsp sesame oil
- 1 tsp red pepper flakes
- ¼ tsp ginger powder
Directions
Begin by creating the soy garlic sauce. In a medium bowl or measuring cup, combine dark soy sauce, water, sesame oil, rice vinegar, honey, light brown sugar, black pepper, minced garlic, and red pepper flakes. Mix until thoroughly combined.
Next, take the chicken thighs and pat them dry with a paper towel. In a large, shallow plate, mix together the all-purpose flour, cornstarch, garlic powder, black pepper, and salt. Prepare to coat each chicken thigh; take one at a time and press both sides into the dry mixture until evenly coated.
Heat approximately 1 tablespoon of vegetable oil in a large pan over medium heat. Once heated, arrange the chicken in an even layer within the pan. Let one side cook for about 2 to 3 minutes until crispy. Flip the chicken to the other side and continue cooking until it becomes crispy as well.
Once both sides achieve that golden-brown color, pour the soy garlic sauce over the chicken. Feel free to adjust the amount of sauce according to your taste preferences—I usually aim to use about three-quarters of it. Let the sauce simmer with the chicken for approximately 4 to 5 minutes until it thickens and becomes glossy. Flip the chicken occasionally while it simmers, ensuring both sides are coated in the sauce.
Serve the soy garlic, pan-fried chicken thighs over a bed of hot white rice, complemented by a side of broccoli. Enjoy every flavorful bite!
Mastering the Technique for Perfectly Crispy Chicken
Technique
Executing this recipe perfectly relies heavily on technique. The choice of boneless chicken thighs contributes to the dish’s flavor, but cooking technique ensures that you achieve the ideal texture. Heating the oil to the right temperature is crucial. If the oil isn’t hot enough, the coating may absorb too much oil and become soggy.
Coating the chicken correctly with the flour and cornstarch mixture forms a protective barrier, allowing for crispiness when frying. Avoid overcrowding the pan as this can lower the heat and lead to steaming rather than frying.
Tips/tricks
A few key tips can make or break the results of your Korean soy garlic chicken thighs. For instance, using a meat thermometer can take the guesswork out of determining doneness. Aim for an internal temperature of 165°F to ensure the chicken cooks thoroughly.
Allowing the coated chicken to rest for about five minutes before frying helps the coating adhere better. Additionally, feel free to customize the sauce according to your preferences. Want it spicier? Add more red pepper flakes. Prefer a sweeter profile? Increase the honey and light brown sugar.
Perfecting Results for Optimal Flavor
Perfecting results
Achieving optimal flavor in your Korean soy garlic dish often comes down to careful ingredient selection and timing. Using fresh garlic enhances the sauce; it releases aromatic compounds that truly elevate the dish.
Another factor that can make this dish stand out is allowing the sauce to simmer as the chicken cooks. This gives time for the flavors to meld and ensures that each piece of chicken gets adequately coated in that delicious sauce.
Troubleshooting/variations
Sometimes, even the most well-laid plans go awry. If your chicken is cooking too quickly or unevenly, it may be necessary to adjust the heat. If the sauce is not thickening to your liking, consider adding a cornstarch slurry (mixing cornstarch with water) to help it along.
For variations, don’t hesitate to switch things up by adding vegetables to the pan while the chicken cooks. Broccoli pairs wonderfully, but slices of bell peppers or snap peas can also bring added flavor and nutrition.
Serving and Presentation Ideas for a Beautiful Meal
Serving/presentation
Presenting your dish beautifully enhances the dining experience. Spoon the glossy soy garlic chicken thighs over a mound of fluffy white rice, allowing the sauce to drizzle down the sides. For a pop of color, include bright green broccoli or any other vegetable on the side.
Consider garnishing the dish with chopped green onions or sesame seeds to add texture and visual appeal. These small additions make a difference in how the meal looks on the table.
Pairings/storage
While Korean soy garlic chicken thighs shine on their own, pairing them with side dishes like steamed vegetables or a simple salad maintains balance on the plate. For storage, allow leftover chicken to cool to room temperature before transferring it to an airtight container. It will keep well in the fridge for up to three days—perfect for lunch or quick dinners.
To reheat, simply warm in a skillet or microwave, adding a splash of water if the sauce has thickened too much.
Conclusion
Preparing a delicious meal that brings people together doesn’t have to be complicated or time-consuming. Korean soy garlic chicken thighs showcase how vibrant flavors and pleasing textures can create an unforgettable dish in about 20 minutes. Embrace this recipe, explore your variations, and watch how it transforms your weeknight dinners into something truly special. Enjoy the simplicity and satisfaction of a meal made with care.
Print
20 Minute Pan Fried Korean Soy Garlic Chicken Thighs
- Prep Time: 10 minutes
- Cook Time: 10 minutes
- Total Time: 20 minutes
- Yield: 4 servings
- Category: Main Course
- Method: Pan Frying
- Cuisine: Korean
- Diet: Gluten-Free Option Available
Description
A quick and easy recipe for pan-fried Korean soy garlic chicken thighs with a crispy exterior and savory sauce.
Ingredients
- 5 pieces boneless chicken thighs
- 4 tbsp cornstarch
- 4 tbsp all-purpose flour
- ½ tsp garlic powder
- ¼ tsp salt
- ¼ tsp black pepper
- 4 tbsp garlic, minced
- ¼ cup dark soy sauce
- ¼ cup water
- 2 tbsp honey
- 2 tbsp rice vinegar
- 2 tbsp light brown sugar
- 1 tsp sesame oil
- 1 tsp red pepper flakes
- ¼ tsp ginger powder
Instructions
- Begin by creating the soy garlic sauce. In a medium bowl or measuring cup, combine dark soy sauce, water, sesame oil, rice vinegar, honey, light brown sugar, black pepper, minced garlic, and red pepper flakes. Mix until thoroughly combined.
- Next, take the chicken thighs and pat them dry with a paper towel. In a large, shallow plate, mix together the all-purpose flour, cornstarch, garlic powder, black pepper, and salt. Prepare to coat each chicken thigh; take one at a time and press both sides into the dry mixture until evenly coated.
- Heat approximately 1 tablespoon of vegetable oil in a large pan over medium heat. Once heated, arrange the chicken in an even layer within the pan. Let one side cook for about 2 to 3 minutes until crispy.
- Flip the chicken to the other side and continue cooking until it becomes crispy as well.
- Once both sides achieve that golden-brown color, pour the soy garlic sauce over the chicken. Let the sauce simmer with the chicken for approximately 4 to 5 minutes until it thickens and becomes glossy.
- Serve the soy garlic pan-fried chicken thighs over a bed of hot white rice, complemented by a side of broccoli.
Notes
Allow the coated chicken to rest for about five minutes before frying for better coating adherence.
