📑 Table of Contents ▶
Cheesy Rotisserie Chicken Enchiladas
Personal stories often revolve around food, and cheesy rotisserie chicken enchiladas hold a special place in many households. I remember the first time I tried creating these enchiladas; the aroma wafting through my kitchen felt like a warm hug. The shredded rotisserie chicken transformed into a comforting meal, enveloped in cozy layers of cheese and enchilada sauce.
Each bite of cheesy rotisserie chicken enchiladas brought back memories of family dinners and friends gathered around the table, sharing laughter and stories. This dish isn’t just about satisfying hunger; it combines convenience and incredible flavors, making it perfect for any weeknight dinner. The rich flavors of chicken, cheese, and sauce meld together beautifully, creating a delightful comfort food experience.
Making cheesy rotisserie chicken enchiladas also brings out creativity. You can adjust the ingredients to suit your preferences, all while maintaining the essence of this crowd-pleasing dish. So let’s dive in and explore how to create cheesy rotisserie chicken enchiladas that will surely impress loved ones and guests alike.
Cheesy Rotisserie Chicken Enchiladas
Fundamentals
Cheesy rotisserie chicken enchiladas provide a delicious and efficient solution for busy weeknights. With rotisserie chicken as the star ingredient, you cut down on cooking time while still enjoying a homemade meal. The process involves layering chicken, cheese, and your favorite sauce into corn tortillas, then baking until bubbly and golden.
Tortillas are the base of these enchiladas. They come in various types, but corn tortillas lend a delightful texture and flavor. The key is to warm them beforehand to prevent cracking when rolling them up. This simple step ensures that each enchilada rolls perfectly, surrounding the savory filling without falling apart.
Additionally, the combination of cheddar and mozzarella cheese creates a melty, gooey texture that enhances every bite. The enchilada sauce, whether red or green, adds a delightful tanginess that ties all the flavors together seamlessly.
Preparation/Setup
To prepare for cheesy rotisserie chicken enchiladas, gather all your ingredients first. This makes the assembly process smooth and efficient. Preheat your oven to 375°F (190°C) while you prepare your filling.
Start by shredding the rotisserie chicken, ensuring to remove any skin and bones. This shredded chicken becomes the flavorful core of your enchiladas. Next, dice the onions and mince the garlic. Their aromatic presence elevates the overall flavor profile.
Afterward, measure your cheese, enchilada sauce, and sour cream. Having everything ready will streamline your assembly process and keep you focused on creating your delicious dish.
Ingredients
Here’s what you’ll need for cheesy rotisserie chicken enchiladas:
- 3 cups rotisserie chicken, shredded
- 8 pieces corn tortillas
- 2 cups shredded cheese (cheddar and mozzarella are great)
- 1 can (10 oz) enchilada sauce (red or green based on your preference)
- 1 cup sour cream
- 1/2 cup diced onions
- 2 cloves garlic, minced
- 1 tablespoon olive oil
- Salt and pepper, to taste
- Fresh cilantro for garnish
Directions
- Begin by preheating your oven to 375°F (190°C).
- In a skillet, heat the olive oil over medium heat. Add the diced onions and minced garlic, cooking until fragrant and translucent.
- Stir in the shredded rotisserie chicken, mixing thoroughly. Season with salt and pepper to taste.
- Pour half the can of enchilada sauce into the bottom of a greased 9×13 inch baking dish, spreading it evenly.
- Take a corn tortilla, fill it with a portion of the chicken mixture, and a sprinkle of shredded cheese. Roll the tortilla tightly and place it seam-side down in the baking dish.
- Repeat the process for all tortillas, placing them snugly in the dish.
- Once filled, pour the remaining enchilada sauce over the top, ensuring each enchilada is coated.
- Sprinkle the remaining cheese over the enchiladas, allowing for a cheesy crust.
- Cover the dish with aluminum foil and bake for 20 minutes.
- After 20 minutes, remove the foil and bake for an additional 10-15 minutes until the cheese is melted and bubbly.
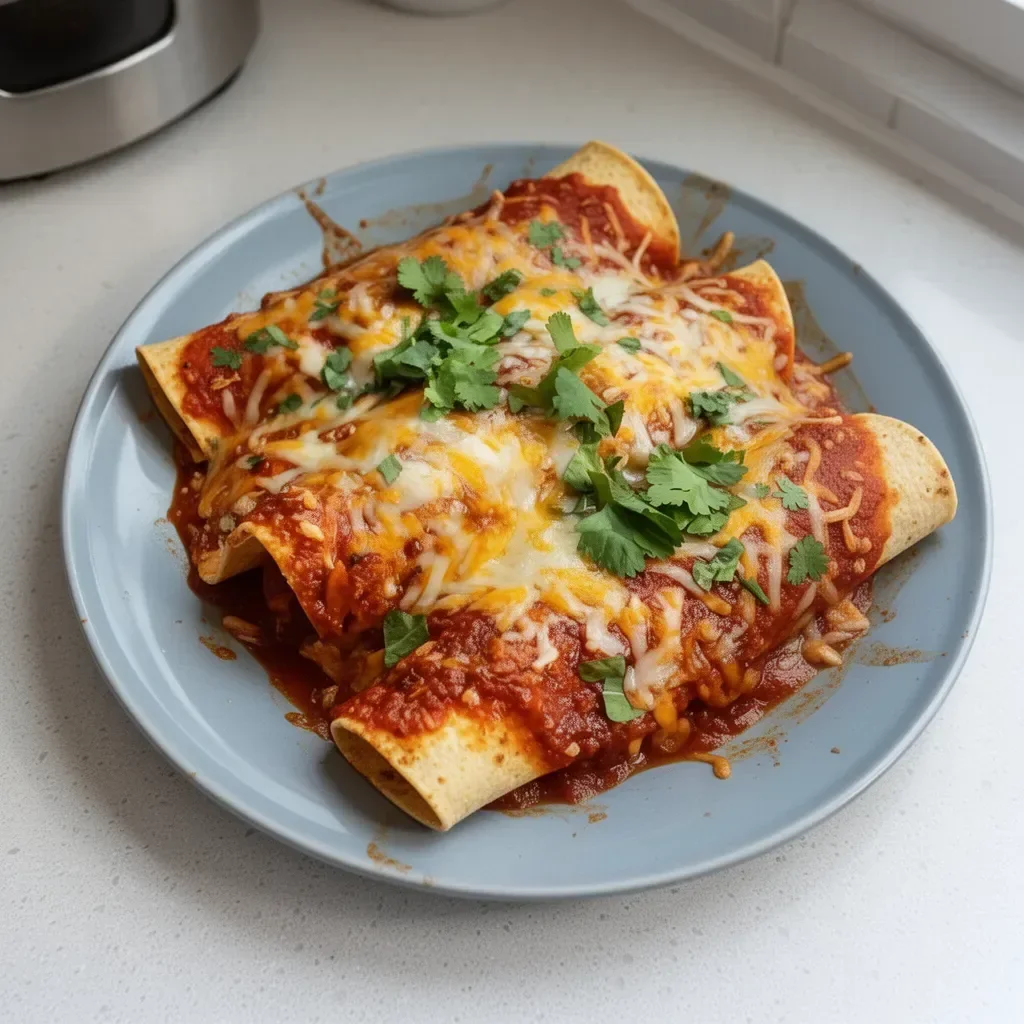
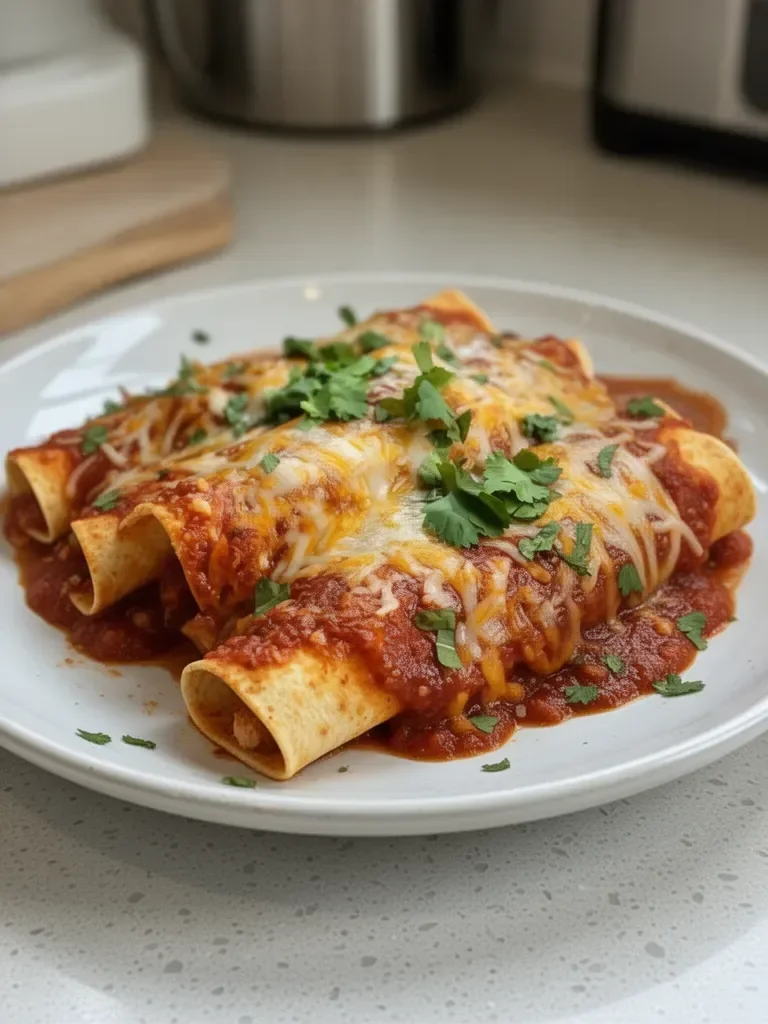
- Finally, remove the dish from the oven and let it cool for a few minutes. Garnish with fresh cilantro before serving.
Mastering Cheesy Rotisserie Chicken Enchiladas
Technique
To create the best cheesy rotisserie chicken enchiladas, focus on your technique. Rolling the tortillas correctly is crucial to prevent tearing. Warm the tortillas in a microwave or on a skillet to make them pliable. This small step will help maintain the integrity of your enchiladas and ensure a beautiful presentation on the plate.
Consider customizing your filling to make it unique. Add black beans or corn for extra texture and flavor. You can also switch up the cheese varieties according to your taste preferences. Experiment with different cheeses, like pepper jack or Monterey Jack, to add a kick.
Always remember, the key to perfect enchiladas is not to overfill them. This small adjustment can mean the difference between perfectly rolled enchiladas and a messy bake.
Tips/Tricks
- For an extra layer of flavor, try toasting the tortillas briefly in the oven before filling them. This helps enhance their corn flavor and adds a slight crunch.
- If you have leftover chicken, this is a great opportunity to use it. Just make sure it’s seasoned well so it complements the enchiladas.
- When choosing enchilada sauce, opt for brands you love. Taste varies greatly across different options, so select one that fits your palate.
Perfecting Results with Cheesy Rotisserie Chicken Enchiladas
Perfecting Results
Perfecting your cheesy rotisserie chicken enchiladas comes down to ensuring the right balance of flavors and textures. Don’t hesitate to taste your filling before rolling it into the tortillas. Adjust seasoning if needed to create the perfect savory blend.
Experiment with the baking time, as ovens vary. The goal is to achieve perfect melty cheese without overcooking the chicken inside. Keep a close eye on the enchiladas during the last few minutes of baking; you want that golden-brown appearance without burning.
Adding toppings after baking? Consider diced avocados, jalapeños, or a sprinkle of fresh lime juice for a burst of freshness.
Troubleshooting/Variations
If you encounter issues, like soggy tortillas, consider using a different brand of tortillas or warming them longer before filling. A common problem is cheese that doesn’t melt properly, which can often indicate insufficient baking time.
For variations, feel free to experiment with the sauce. If you prefer a spicy kick, opt for a green sauce or add diced jalapeños into the filling.
You can also swap the chicken for shredded turkey for a holiday-inspired twist or play around with different proteins if you want. The beauty of enchiladas lies in their versatility, allowing you to customize them to fit any occasion.
Serving Cheesy Rotisserie Chicken Enchiladas
Serving/Presentation
Presenting your cheesy rotisserie chicken enchiladas can add to the dining experience. Arrange them neatly on a platter and drizzle additional enchilada sauce over the top before adding your garnish.
A sprinkle of fresh cilantro not only enhances flavor but adds a pop of color, making the dish more appealing. Serve these enchiladas with a side of sour cream or guacamole to enhance the dish further.
Pairings/Storage
For the perfect accompaniment, consider serving your cheesy rotisserie chicken enchiladas with a fresh garden salad. The crispness of the salad contrasts beautifully with the creamy nature of the enchiladas. You can also serve them with chips and salsa for a satisfying starter.
When storing leftovers, place the enchiladas in an airtight container. They maintain their quality for about three to four days in the refrigerator. Reheat them in the oven or microwave before serving, ensuring they don’t lose their delightful textures.
Cheesy rotisserie chicken enchiladas simplify dinner while providing that comforting homemade flavor. They cater to everyone and can easily adapt to personal tastes, making them a favorite for any table.
Cheesy rotisserie chicken enchiladas hold a special place in both casual and celebratory meals, allowing for a dish that everyone can enjoy effortlessly.
Print
Cheesy Rotisserie Chicken Enchiladas
- Prep Time: 15 minutes
- Cook Time: 30 minutes
- Total Time: 45 minutes
- Yield: 4 servings
- Category: Main Course
- Method: Baking
- Cuisine: Mexican
- Diet: None
Description
Delicious cheesy enchiladas filled with shredded rotisserie chicken, layered with cheese and enchilada sauce, perfect for a comforting weeknight dinner.
Ingredients
- 3 cups rotisserie chicken, shredded
- 8 pieces corn tortillas
- 2 cups shredded cheese (cheddar and mozzarella)
- 1 can (10 oz) enchilada sauce (red or green)
- 1 cup sour cream
- 1/2 cup diced onions
- 2 cloves garlic, minced
- 1 tablespoon olive oil
- Salt and pepper, to taste
- Fresh cilantro for garnish
Instructions
- Preheat your oven to 375°F (190°C).
- Heat the olive oil in a skillet over medium heat. Add the diced onions and minced garlic, cooking until fragrant and translucent.
- Stir in the shredded rotisserie chicken, mixing thoroughly. Season with salt and pepper to taste.
- Pour half the can of enchilada sauce into the bottom of a greased 9×13 inch baking dish, spreading it evenly.
- Take a corn tortilla, fill it with a portion of the chicken mixture, and a sprinkle of shredded cheese. Roll the tortilla tightly and place it seam-side down in the baking dish.
- Repeat the process for all tortillas, placing them snugly in the dish.
- Once filled, pour the remaining enchilada sauce over the top, ensuring each enchilada is coated.
- Sprinkle the remaining cheese over the enchiladas, allowing for a cheesy crust.
- Cover the dish with aluminum foil and bake for 20 minutes.
- After 20 minutes, remove the foil and bake for an additional 10-15 minutes until the cheese is melted and bubbly.
- Finally, remove the dish from the oven and let it cool for a few minutes. Garnish with fresh cilantro before serving.
Notes
Customize with additional ingredients like black beans or corn for extra texture.
